
Business Case
In scenarios wherein a Subscriber calls/emails the sales or support team requesting them to be unsubscribed from any further email communication the only option for the client is to do this in SFMC. But, as it stands, it is not normal practice, and recommended that all CRM users also have access to SFMC. The client was looking for a solution wherein If a CRM user updates the value of the Email Opt-out field on a Contact or Lead record as ” True” the same gets updated on SFMC in all Subscriber lists as “Unsubscribed”. They wanted this process to be automatic.
Here is a walkthrough of the solution we provided to them.
Solution Approach
- For the above requirement, we will need automation. In this automation, certain activities are required such as SQL Query, Verification, Data Extract, File Transfer, and Import File.
- Fetch the data from the SQL query, drop that data on FTP or Safe House, then import the data and update the subscribers’ status in All Subscribers.
Solution
Let’s buckle down the solution
Step:1 Create Target Data Extension
Click here to know how to create Data Extension in SFMC.
Step:2 Create a new Automation:
From the Marketing Cloud Dashboard, click on the Journey Builder and select Automation Studio.

Create a new Automation by navigating to the top right corner of the page and clicking on New Automation.
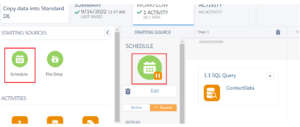
In Automation, select starting source as Schedule. The schedule defines the time frame in which this query is supposed to run in automation.
SQL Query: Use Query Activity to fetch the data from Contact and Lead synchronized data extensions and store the results in the target data extension created above in Step: 1.
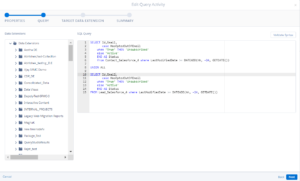
SELECT Id, Email,
case HasOptedOutOfEmail when ‘True’ THEN ‘Unsubscribed’
else ‘Active’
END AS Status
from Contact_Salesforce_4 where LastModifiedDate >= DATEADD(hh, -24, GETDATE())
UNION ALL
SELECT Id, Email,
case HasOptedOutOfEmail when ‘True’ THEN ‘Unsubscribed’
else ‘Active’
END AS Status
FROM Lead_Salesforce_4 where LastModifiedDate >= DATEADD(hh, -24, GETDATE())
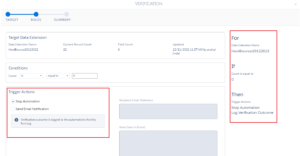
Verification Activity: After SQL Query, we have added a Verification Activity to avoid unintended automation outcomes. The activity lets you select a target data extension in your automation and evaluate the target data extension for the conditions you set. For this use case, use the conditions as in the screenshot to check the record count so that the activity can stop the automation if the conditions are met.
Verification Activity is used in order to stop the automation if there are no records.
Data Extract Activity: Use this activity to extract records from the target data extension created in the SQL Query Activity.
Note: The ‘DECustomer Key’ should be the same as the target data extension External Key.

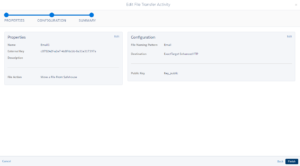
File Transfer Activity: With the File Transfer Activity, you can securely transfer files from the Marketing Cloud’s secure file transfer location, the Safehouse, to a selected FTP location.
Import File Activity: Use this activity to import the data into the All Subscriber list.
- Complete the Properties section:
- Name
- Description
- Click on Next

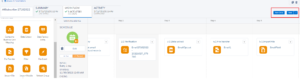
- Select the File Location from the drop-down menu and write the file Name into the File Naming Pattern section.
- Click on Next.
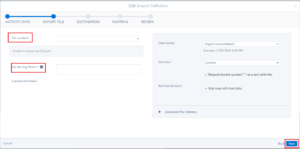
Destination Type – Import the information into
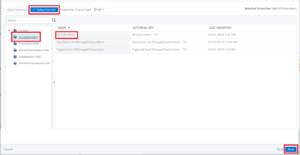
- Inside the Import Activity, you would click the ‘Subscriber List‘ tab and then a folder that says ‘My Subscribers‘. This will contain All Subscribers. Then you can choose the list.
- Click on Next.
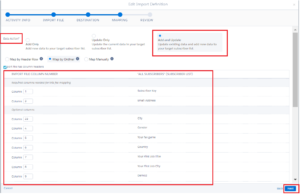
Select the Data Action and Map the Fields.
- For this use case, select Add and Update data action.
- Click on Next
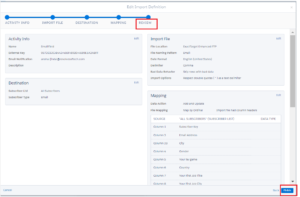
- At the end of the Import activity REVIEW screen will appear that displays the summary of the Import activity.
- Click on Finish.
Note: In data extract, file transfer, and import file activity, the naming pattern for the File Naming Pattern field should be the same.
Click on the Save(top right corner) button and Run the activities by clicking on Run Once.
Click on the Select All Activities button.
After clicking the Select All Activities button. To run the automation, click on the Run button on the right.

If there is any error it will show up in the Activity tab.
If there is no error, the automation will run successfully and the data will show up in the target data extension and the All Subscribers will get updated.


