

Overview:
All Subscriber list is the keeper of the email address used for sending email to subscribers. The way this works is when an email is sent through a DE or Journey or any other sending method in SFMC, the process goes something like this.
Check the send relationship in DE i.e the field.

So in the case above, at the time of send Salesforce will do the following.
IF, Id is not found, then a subscriber is created in all subscriber list and email address in DE is added and used for sending.
IF, Id is found in All subscriber list -> Email is sent to subscriber using the value found in “Email Address” field of the subscriber in all subscriber list. Please note, the email Address available in this DE is not used for sending but the email address already available in All subscriber is used for sending the email. This is the exact problem we are trying to solve through this blog, though this is also important to mention that in when an email is sent to “Salesforce Data extension” or through Journey’s the email address available in DE is used for sending an is overwritten in All Subscribers list. Although the problem with Journey’s is they are triggered based on an email and every time an email address is changed can not be considered to be an event. Other blogs in the series will focus on less code dependent solutions such as Automation Studio or Journey’s, so stay tuned for those updates.
Use Case:
When the email address is updated on Lead/Contact records then real time sync the email address to SFMC all subscriber list also. This solution walks you through the process for Lead as well as Contact but you can use it for the object as needed, this solution focuses on CRM code development, I will have another blog that will focus on this being done without any code and is entirely focused on SFMC.
Step 1: Create an invocable Apex Class in salesforce org
We need to create an invocable apex class, which will call SFMC cloud page using HTTP request. This class will be called by a record trigger flow.
Steps to create an Invocable Apex Class
- Go to Developer Console >>Create Apex Class>>YourApexClassName
- Add below code , here for reference the class name is taken as “SFMCCloudPageAPICaller”.
// Apex Class Name: SFMCCloudPageAPICaller
public class SFMCCloudPageAPICaller {
    public class ToSend {
        @InvocableVariable(label='EndPoint URL' required=true)
        public String url;
        @InvocableVariable(label='SF Id' required=true)
        public String sfId;
        @InvocableVariable(label='Email' required=true)
        public String sfNewEmail;
    }

    public static String apexCallOutEngine(String JSONString) {
        ToSend toSend = ((ToSend)JSON.deserialize(JSONString, ToSend.class));
        String url = toSend.url;
        Http h = new Http();
        HttpRequest hr = new HttpRequest();
        HttpResponse resp = new HttpResponse();
        hr.setMethod('POST');
        Map<String,String> jsonbody = new Map<String,String>();
        jsonbody.put('sfId', toSend.sfId);
        jsonbody.put('email', toSend.sfNewEmail);
        hr.setBody(JSON.serialize(jsonbody));
        hr.setEndpoint(url);
        hr.setHeader('Content-Type', 'application/json');
        hr.setHeader('token', 'dju8Y3j23OikLe9xzNnpqQwaE');
        try {
            resp = h.send(hr);
            System.debug('Response code: '+resp.getStatusCode());
            String body = resp.getBody();
            if (body==null) { body = ''; }
            String result = '{"http_status_code": '+resp.getStatusCode()+' , "data":'+body+'}';
            System.debug('Response: '+result);
            return result;
        } catch (Exception e) {
            System.debug('Callout Error:' + e.getMessage());
        }
        return null;
    }

    @future(callout=true)
    public static void apexcallout(String JSONString) {
        apexCallOutEngine(JSONString);
        return;
    }

    @InvocableMethod(label='Send Data to SFMC' description='Send Data to SFMC' Category='FlowActions')
    public static List process(List toSends) {
        for (ToSend toSend: toSends) {
            String JSONString = JSON.serialize(toSend);
            String result = null;
            apexcallout(JSONString);
        }
        return null;
    }
}
Step 2: Creating a Cloud Page in Salesforce Marketing Cloud
The changes made in salesforce Contact/Lead will be handled by cloud page in SFMC. The URL of this page will be given as endpoint in record triggered flow, that we will create in next step.
- Login into SFMC account and if have multiple BU then select required BU which is connected with your salesforce org.
- Go to Cloud Page in web studio tab.

- Select a Collection/Create New Collection then create new code resource as follow.

- Write below code in your cloud page. Here for reference the name of cloud page is given as “SubscriberEmailUpdateSync”.
// Cloud Page: SubscriberEmailUpdateSync <script runat = server > Platform.Load("core", "1"); Platform.Response.SetResponseHeader("Content-Type","application/json"); Platform.Response.SetResponseHeader("Access-Control-Allow-Origin","*"); var jsonpost = Platform.Request.GetPostData(); var jsonresponse = Platform.Function.ParseJSON(jsonpost); var token = Platform.Request.GetRequestHeader('token'); var response = { "result" : "", "message": "" } if(token == "dju8Y3j23OikLe9xzNnpqQwaE"){ if(jsonpost !== undefined && jsonpost !== null && jsonpost !== ''){ var dataSFId = jsonresponse.sfId; var dataEmail = jsonresponse.email; try{ var results = Subscriber.Retrieve({ Property: "SubscriberKey", SimpleOperator: "equals", Value: dataSFId }); if (results > 0) { var subscriber = { "EmailAddress": dataEmail }; var subObj = Subscriber.Init(dataSFId); var status = subObj.Update(subscriber); response.result = "success"; response.message = "subscriber synced."; Write(Stringify(response)); }else{ response.result = "success"; response.message = "subscriber not found."; Write(Stringify(response)); } }catch(ex){ response.result = "error"; response.message = Stringify(ex); Write(Stringify(response)); } } }else{ response.result = "error"; response.message = "Token is missing/incorrect in request header."; Write(Stringify(response)); } </script> - Save and Publish the cloud page.
Step 3: Create a record triggered flow in salesforce org
Since this tool will update all subscriber list whenever a lead or contact will be updated in CRM, so there is need to create two record trigger flow, one for contact and one for lead, Hence whenever a contact or lead will be updated these flow will fire and call invocable class which we have created earlier.
Steps to create Record Triggered Flow
- Triggered Flow on the Lead Object
Go To Setup -> Flows -> Create New Record-Triggered Flow
Select Object : Lead
Configure Trigger : A record is updated
-
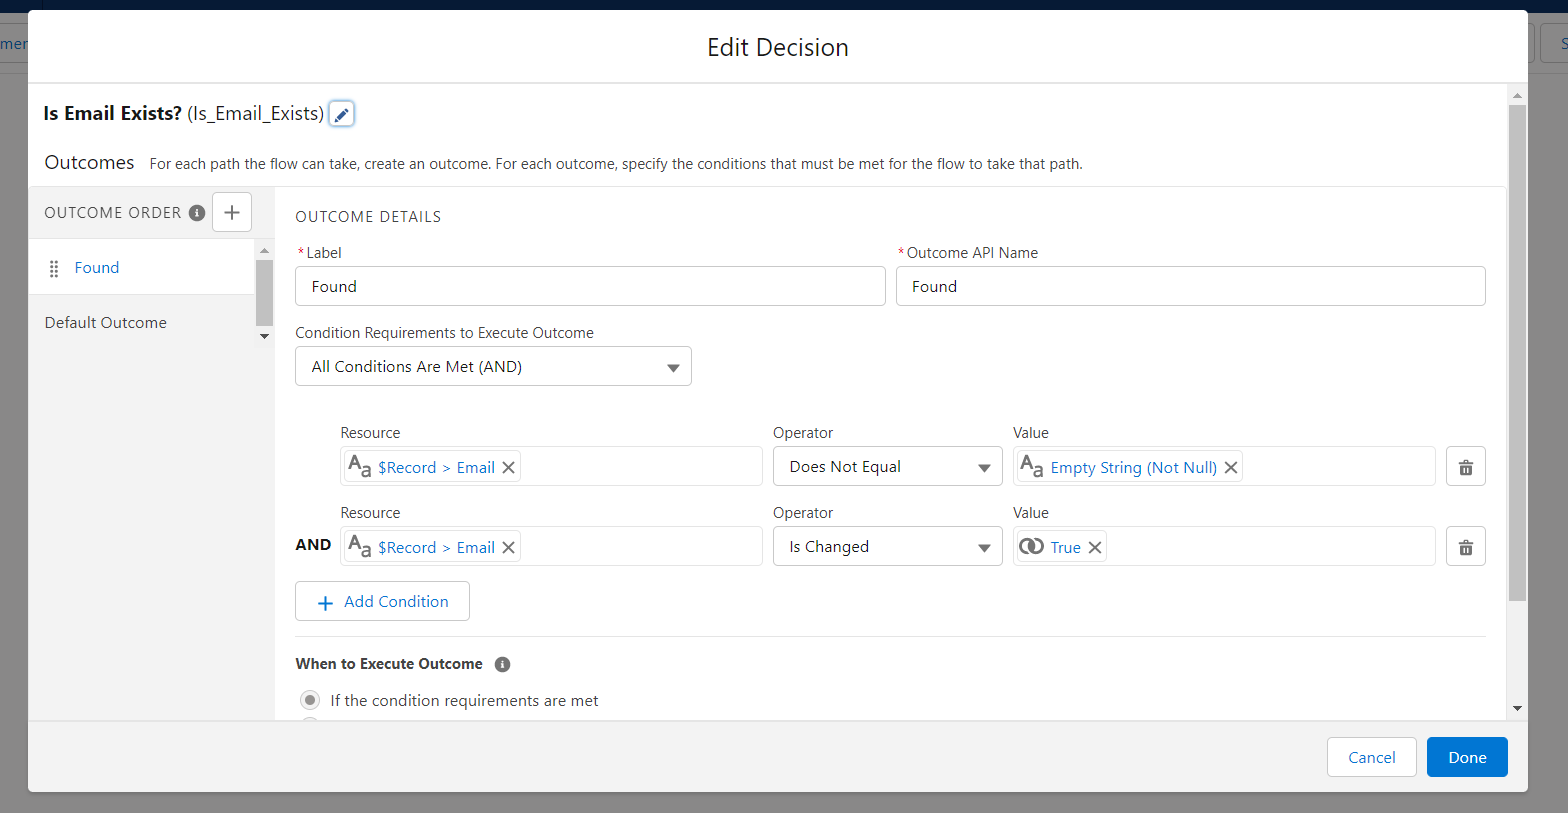
- Since this tool is to update the email address in all subscriber list so we will add two condition here, one to check whether email is updated which should be true and Email address should not be null.
- If both condition will be true, then we will assign an Apex action in which we have to provide SFMC cloud page URL we have created in step 2 as End point URL. Basically this action will call cloud page of SFMC.


- Save and Activate the Flow once done.
- Now we have to create similar flow on Contact object with same configuration.
Note: Apex action name will be same in both flows, here for reference apex action name is taken as “Send Data to SFMC”. This name is also being used in Invocable Apex class.
-
- Triggered Flow on the Contact ObjectNeed to follow same steps as Lead Flow.

Step 4: Test your tool.
- Update any Contact/Lead email address in CRM org. Make sure the subscriber should already there in your SFMC Org.
- Once updated check the subscriber email in your SFMC org.


