
This is part of the Litmus testing blog, you can read Part 1 here.
Litmus Tool:
You can create a new email in Litmus and test it or can bring in the email from your ESP and preview and test it. Let’s see how? Three options are there when you click on New Email viz. Build, Test, Collaborate.
-
Build: It will take you to the main tool in Litmus for email creation. You can create your email in All Emails and then move it to a folder/subfolder or directly create it in the folder or subfolder.
-
Test: It will help you run pre-send QA checks. It helps to send the code from your ESP to Litmus and then preview and test it.
-
Collaborate: It helps you to review and approve your emails with other stakeholders.
1. Building an email in Litmus using the Build option:
There are a lot of ways to build an email using Litmus, but here we will be focusing on creating an email using Build Option. Follow the below steps:
-
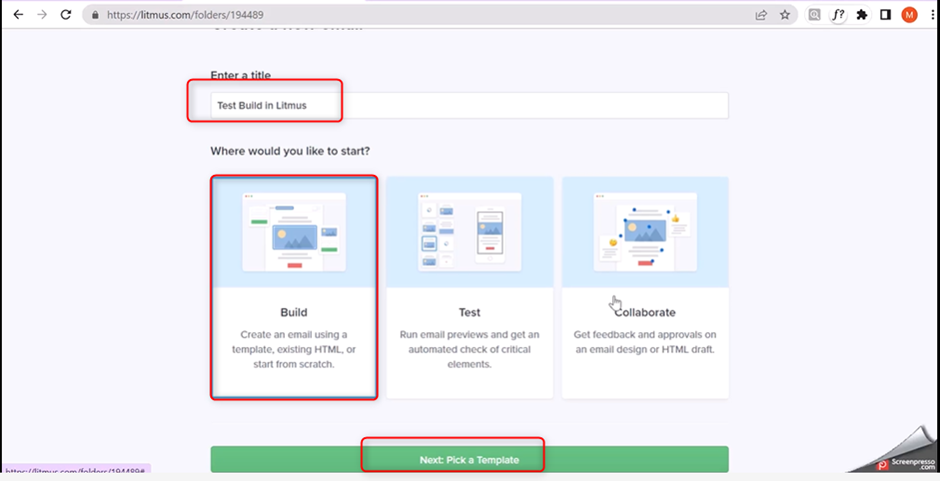
Click on the New Email option in the upper right-hand corner of the home page.

-
Enter the title (the name of the email) and select the Build option from the three options available.
-
Build: It will take you to the main tool in Litmus for email creation.
-
Test: This option helps you send pre-send QA checks.
-
Collaborate: It helps to review and approve your emails with other stakeholders.
-
-
Click on Next: Pick a template button.
-
You can build an email using an existing template or import HTML from Dropbox, Google Drive, or One Drive. For a demo, we will be using an existing template.

-
Select a template and an email will open. Under the Builder tab, you can change the content, subject line, and preview text. The content can be changed using the visual view or code view. Code view allows you to update the CSS of your email.

-
After all the changes, save your email.
-
Preview your emails in the Previews & QA tab but before that, you need to Update Proof & Previews tabs on the right-hand corner of the email template.
-
You can check your emails in Preview & QA tab on multiple devices and browsers.
-
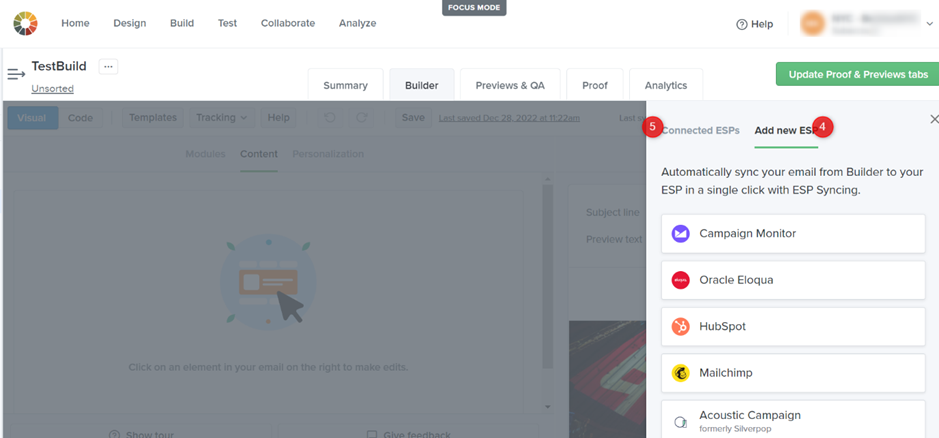
In the Builder tab, you can Sync your email to your ESP(Marketing Cloud). When you click on Sync to ESP, it will show the name of the ESP and the business unit where you want to save your business unit. Click on it. You can save your email as a Campaign or as a Template. Specify the folder where you want to save your emails in Marketing Cloud and click on Sync.
-
All set to go…you can view your emails created in Litmus in Marketing Cloud.
Important Notes:
-
You can build a template from Litmus and sync it to your ESP (Marketing Cloud), but you cannot update the same template by adding content blocks or layouts in Marketing Cloud.
-
For creating a template-based email, you need to switch to the marketing cloud and then use the template created in Litmus.
-
You can sync an email from Litmus to Marketing Cloud, but you cannot sync the same email after making edits to the content from Marketing Cloud to Litmus.
-
Using the Build option, you can create an email in Litmus by adding your HTML code or picking up an existing template, but you cannot build dynamic content or an Amp script. This can be possible using the Test option.
Other features in Build Option:
-
You can send a test email you have created in Litmus to your email Id.
-
Choose email clients and devices where you want to preview and test your emails.
-
In Email Preview, you can test and preview the email where you have created without switching to Previews & QA tab.
-
You can add new ESPs with Litmus. ESP Sync for Salesforce Marketing Cloud
-
Synchronize your emails created in Litmus with your connected ESPs.

2. Testing an email in Litmus created in Marketing Cloud using Test Option:
How to bring your HTML code from your ESP to Litmus and test it?
-
With the Test option, you can save time and streamline the email production and testing process, including emails with personalized, dynamic content.
-
Reduce review cycles.
-
Stay on brand and error-free.
Steps:
-
Login to your Litmus account.
-
On the Home Tab, click on Send in your email or click on Create New and enter the title of the email and click on test and click on Next: Bring in your email


-
Copy the address generated by Litmus and paste it into the Marketing Could Email Studio Preview and test tab.


-
Login to your Marketing Cloud account and go to Email Studio
-
Click on the Content tab and select the email you want to send to Litmus for testing
-
In the Preview and Test tab of your email, paste the address that you copied in Step 3 from Litmus.
-
Click on Send and move back to Litmus. On the home tab, you will see your email
-
Open the email to check on different devices and browsers.
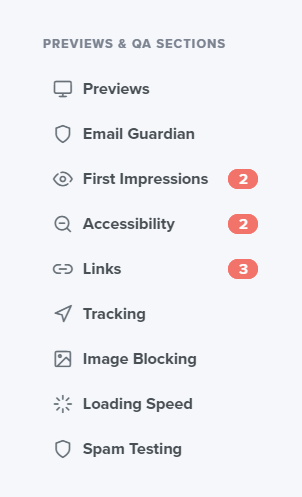
Preview & QA tab Recommendations: There are some recommendations that Litmus provides you when you send your email from Marketing Cloud to Litmus. It shows the test results on your Litmus email so that you can improve the deliverability of your email.
To check the test results of the email that we have used in the above testing use the Previews & QA tab. On the left-hand side of this tab, there is a Preview & QA section that helps to check what all issues are there in your email apart from rendering issues.
For a detailed study of all the tabs Click Here.
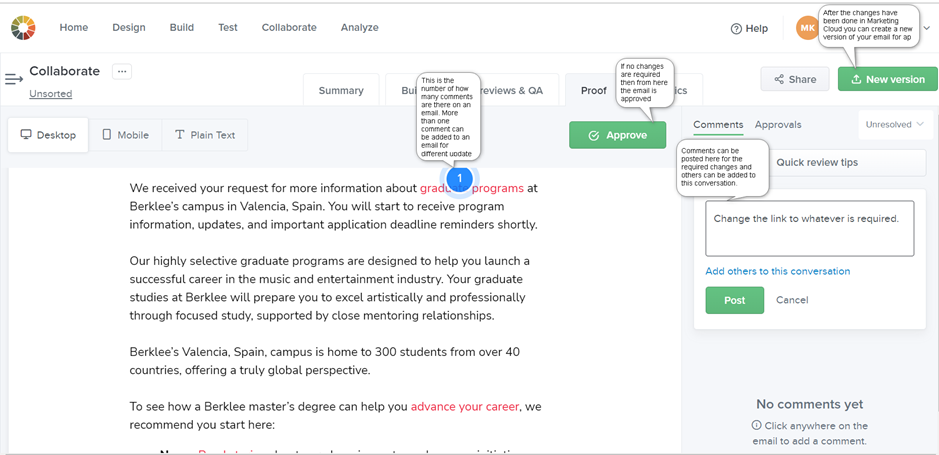
3. Collaborate:
This option allows you to share your emails with stakeholders for approval or any required changes. After reviewing, the Stakeholders can check the emails and their links and add comments in the proof section. You can then make changes in Marketing Cloud and create a new version of the email. By creating a new version, you can check all the changes done to the email in the old versions. This reduces the stress of deleting and bringing back the email to Litmus.
Analytics Tab:
Litmus’ Email Analytics breaks down your open rate to tell you how many people deleted your email, compared to how many read it; and tracks the email client usage across your mailing lists. For a more detailed view, create a tracking code for your emails. Click Here to Learn More


