
Synchronized Data Extensions are created in Marketing Cloud when an object data is imported from the sales or service cloud. You cannot add records manually to the Synchronized data extension. Synchronized data extensions are automatically added to your data model in the contact builder. They are stored in a separate data extension folder (Synchronized Data Extension folder). We cannot use these data extensions to write back to the Sales cloud from Marketing Cloud.
Business Case
Our Client wanted to fetch the data from Salesforce CRM to Marketing Cloud and use that data in automation and Journeys. We asked them to install Marketing Cloud Connect to synchronize data from the sales/service cloud into the marketing cloud contact builder and check the Synchronized data extensions.
But the problem was, they were unable to use this data as Salesforce Marketing Cloud does not allow synchronized data extensions to be sendable and that we need to create a sendable data extension within Marketing Cloud to send emails to customers, Subscribers, or prospects.
Solution Approach
- Solution approach started with creating a sendable data extension with the required attributes from the synchronized data extension.
- Then we created automation using SQL query to copy the data from the Synchronized data extension to the standard data extension that updates automatically.
Solution
A detailed solution to solve this business requirement:
Step:1 Create Data Extension
There are two ways to create a data extension:
- Creating Standard Data Extension
- Creating Standard Data Extension using Filtered Data Extension
Click here to know how to create Data Extension in SFMC.
Step: 2 Create an Automation
- From the Marketing Cloud Dashboard, click on the Journey Builder and select Automation Studio.
- Create a new Automation by navigating to the top right corner of the page and clicking on the New Automation.
- In the Automation, select starting source as Schedule.
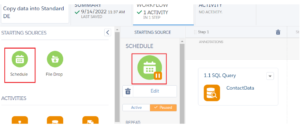
The schedule defines the time frame in which this query is supposed to run in automation.
Use SQL Query activity (drag and drop) in Automation Studio and store the data of this query to target data extension created in Step 1.

SQL Query:
SELECT
AccountId, Id, CreatedById, Email, HasOptedOutOfEmail, IndividualId, LastModifiedById, MasterRecordId, OwnerId, ReportsToId, FirstName
FROM
Contact_Salesforce_3 (Synchronized DataExtension Name)
- Click on the Save(top right corner) button and Run the activities by clicking on Run Once.
- Click on the Select All Activities button.
- After clicking the Select All Activities button. To run the automation, click on the Run button on the right.
- If there is any error it will show up in the Activity tab.

- If there is no error, the automation will run successfully and the data will show up in the data extension.


