
Overview:
Advertising Studio Marketing Cloud aids in re-engaging inactive users, discovering new prospects, and succeeding with modern advertising. This is a method to get in touch with customers wherever they are. Customers can utilize Marketing Cloud data to target their digital advertising campaigns on social media platforms (viz. Facebook, Google, Twitter, LinkedIn, Social Studio, Pinterest, Snapchat). No matter if you are managing campaigns for dozens or millions, your customer records remain up-to-date.
With an Advertising Studio account, you get 5 audiences. If required, you can purchase additional audiences.
Note: Advertising Studio comes in only one edition, Professional, which is priced at $2000/month as mentioned by Salesforce in the link https://www.salesforce.com/in/editions-pricing/marketing-cloud/ads/
Use Case:
The client wanted to utilize the data they have on Salesforce CRM combined with the subscriber engagement for those using Salesforce Marketing Cloud to create a specific targeted list that they can use directly on Advertising platforms. The client was trying to remove the manual steps they needed to do to bring data from multiple systems i.e., Salesforce Marketing Cloud and Salesforce CRM, merge them to create the specific target list, and then upload on advertising platforms such as LinkedIn, Google, or FB to be able to target the subscribers. We will try to meet this use case by using the power of salesforce-connected systems and advertising studio platforms to automate all these activities.
Solution Approach:
We provide them with the solution by following the steps-
- We asked the client to create the reports on Salesforce CRM to create the targeted audience on the Salesforce Marketing Cloud for Advertising Studio.
- We pulled the data from Salesforce Reports using automated SQL queries to a data extension.
- We asked the client to connect their social accounts to Advertising Studio (viz. Meta i.e., Facebook, Google AdWords, LinkedIn).
- Then, we created around 20 audiences by mapping the data from the data extensions created in Step 2 with the social platform identifiers (like email address, first name, last name, City, State, Country, Phone Number, and many others) and activated the audience.
What are the benefits (use cases) of Advertising Studio?
- Acquisition and Leads:
Advertising Studio helps you introduce people to your brand for the first time and urge them to purchase or sign up for a service: Facebook Lookalike audiences, Google similar audiences, and Lead Capture.
- Engagement of non-active customers:
Using Advertising Studio, you can establish and nurture a relationship with your existing customers to maintain a strong connection. Example: A person who bought sportswear clothing and shoes may respond best to ads tailored towards Sports tools and sportswear.
- Upselling, cross-selling and Re-engagement:
You can increase your revenue and improve customer satisfaction by building strong relationships with your customers. Upsell and Cross-sell your products by providing them with complimentary products and higher-end products according to what you know about them, thus expanding their boundaries. You can also re-engage your inactive users or subscribers, thus keeping your audience fresh.
- Optimizing and Suppressing Audience:
To increase Return on Investment (ROI), you can use Advertising Studio which helps you save money by not spending on the audience/people to whom you don’t want to send ads. Examples: People who have recently purchased the product or service you are marketing may be considered a suppression audience or unhappy customers, angry customers who should not be shown promotional ads.
Prerequisites for Advertising Studio:
Refer to the document by Salesforce:
https://help.salesforce.com/s/articleView?id=sf.mc_ads_get_started_with_advertising_audiences.htm&type=5
How do you create an Audience using Advertising Studio?
The audience in the advertising studio in the Salesforce Marketing Cloud allows you to target your digital advertising campaigns across various platforms using Marketing Cloud data.
Note:
- If you have one list or DE and use the same for Facebook and Google AdWords, Advertising Studio treats them as two separate Audiences.
- We can create Audience in Salesforce Marketing Cloud but they get published on social platforms.
There are two tabs when you click on Advertising Audiences:
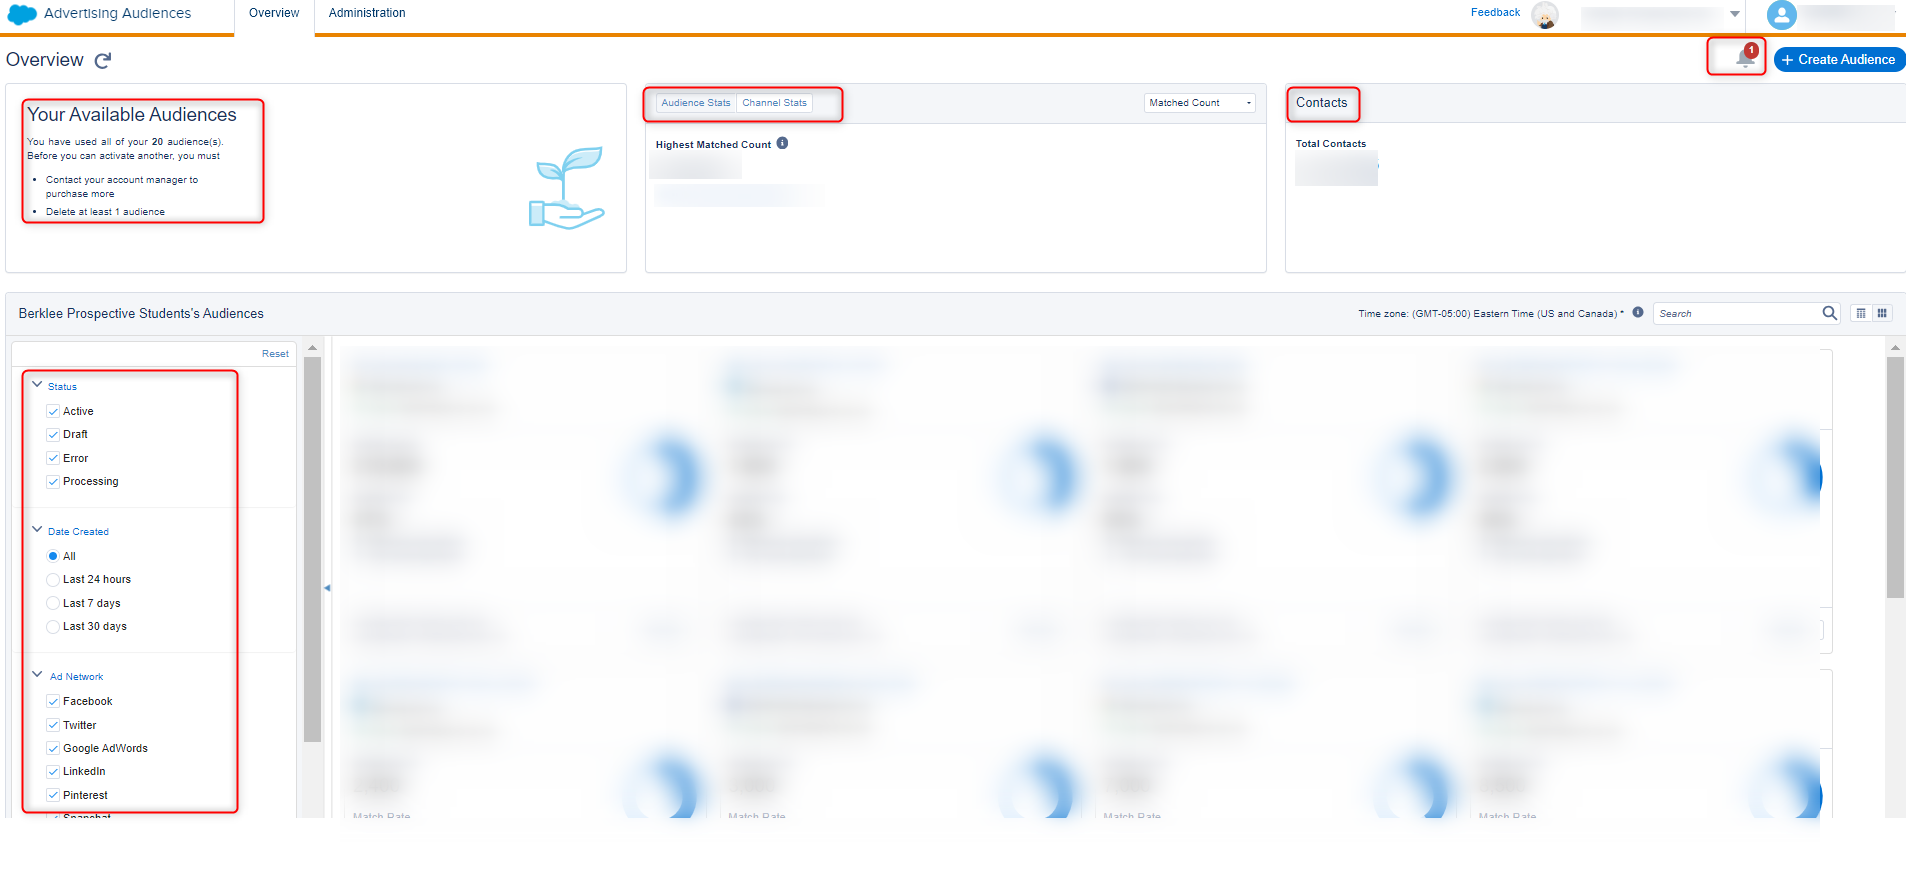
- Overview:
It includes all the audiences related to all the accounts you have added under the Administration tab and other details such as –
-
- Audience Stats: represents the Audience with the Highest Matched Count
- Channel Stats: represents which channel has the Highest Matched Count, total audience, match rate, channel rate, etc.
- Contacts: Total matched contacts in all the audience for all the social accounts you have added.
- Your Available Audience: It displays the number of audiences you have and how many you can add more.
- Filters: In the left-hand side panel some filters can help you to filter your audience.
-
- Administration:
You can add your social accounts here that can be used while creating an audience. All the accounts for each social platform will be displayed separately.

Let’s explore more about Advertising Studio:
Step 1 – Connect your social accounts
- Go to Advertising Studio and select Advertising Audiences
- Before creating an audience, add a social platform using the Administration tab.
- Click the icon to add or configure accounts. Here, we are connecting Facebook accounts.
- A pop-up screen will appear asking you to sign in to your account
- After signing in your account will be added to the administration tab and connected to your Marketing Cloud instance.
- Your accounts will be displayed separately under each of the accounts. For Example: If you added four Facebook accounts, 3 LinkedIn accounts, 2 Google accounts, and others, they will be displayed as in the screenshot:

Step 2 – Now, create an audience
By using Advertising Audiences, marketers can easily reach customers on the channels they visit the most, whether it’s Facebook, Google, Instagram, or any other. Advertising Audiences allows advertisers to customize experiences and create specific audiences by utilizing first-party data as a key advantage. You can create, update, and delete the audience in Advertising Studio.
- Go to the Overview tab and click the Create Audience button on the right-hand side.
- Choose the name for the audience: The name is the audience’s unique identifier in both the application and social ad accounts.
- Select the Onboarding Partner: If applicable
- Select the destination: It includes the platform on which to use the audience. In our case, it will be Facebook.
- Choose the Ad Account (Facebook): The Account ID of your social account
- Click on the Configure button or click Save & Close.
A configuration page is displayed. This page is different for different advertising platforms.
It includes the following details:
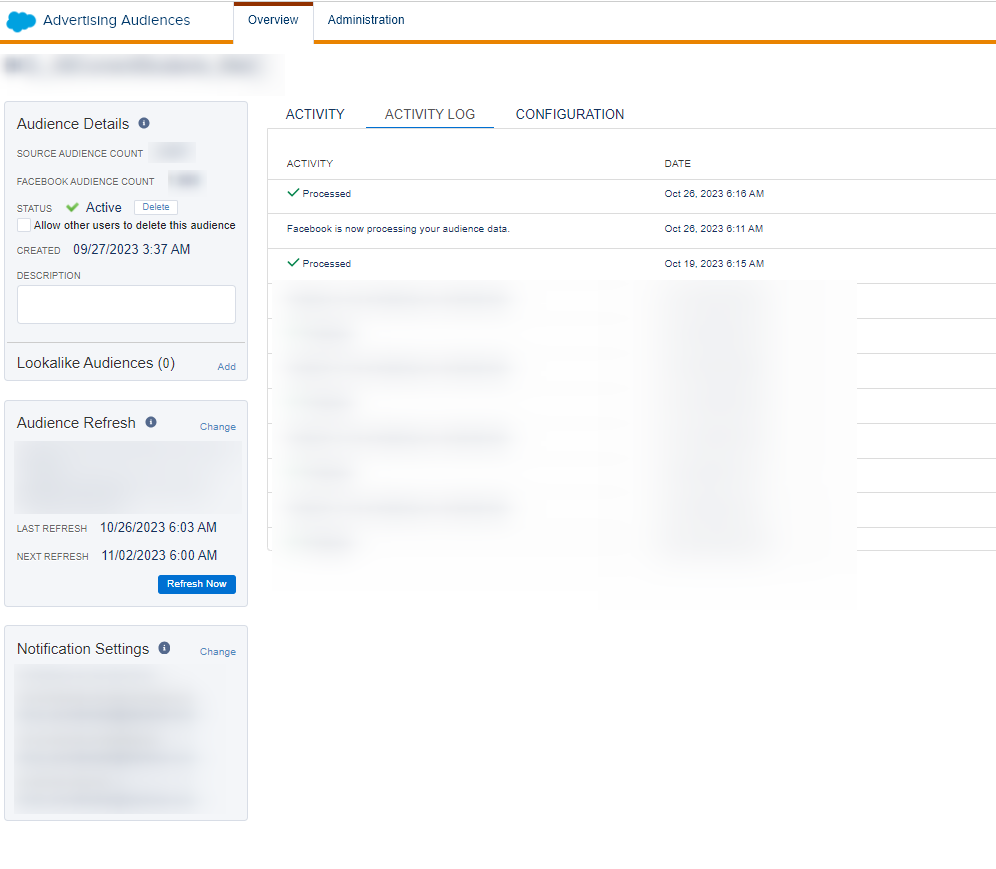
- Audience Details: The data sources for an audience can be any such as Data Extension, Salesforce Reports, or Data imports. The data in these can be updated using automation.
- Source Audience Count: The total number of subscribers in your source (i.e., Data Extension or Contact List)
- Facebook Audience Count – The audience size on your social account after meeting the criteria configured in the Configuration
- Status: Displays the
- Description: You can add the description for your audience.
Note: Audience sizes are available once the audience is uploaded successfully.
Audience Refresh: It is used to synchronize your audience data with your associated network. This option is available when you publish your audience.
You can refresh and update the time and timezone of your audience.
- Click on the Audience you created.
- On the Activity tab, you will Audience Refresh in the left-side panel
- Click on change and change the time and Save
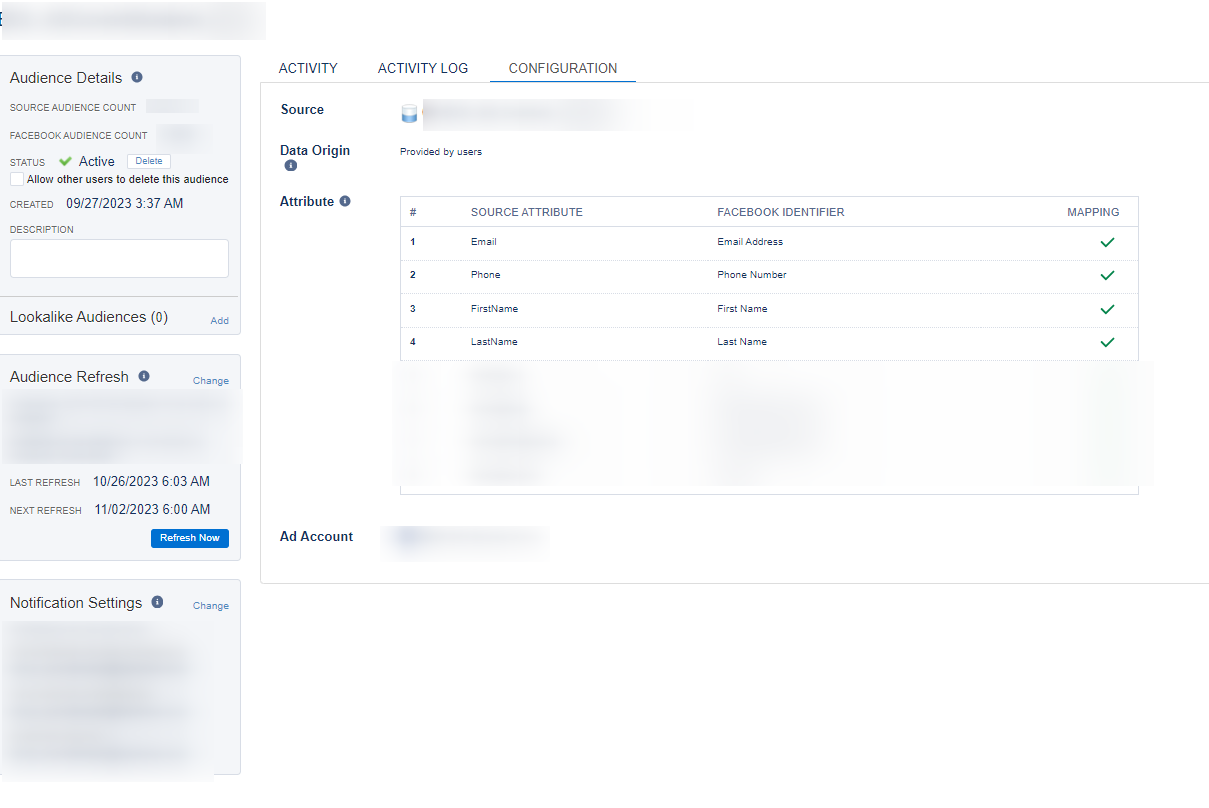
For Facebook Configuration Page:
- You will see two options to add an audience (viz. Data Extensions, Contact List). Select either of the two.
- If the Data Extension option is selected, the next page displays the following:
- Source: displays the data extension or list of audience you selected in the previous step.
- Data Origin: It defines how your custom audience user data was sourced
- Provided by users- Select this if the data is provided directly by users (first-party data)
- Provided by Partner(s)- Select this if the data was provided by a partner (third-party data)
- Provided by both users and partner(s)- Select this option if it is a combination of the above two.
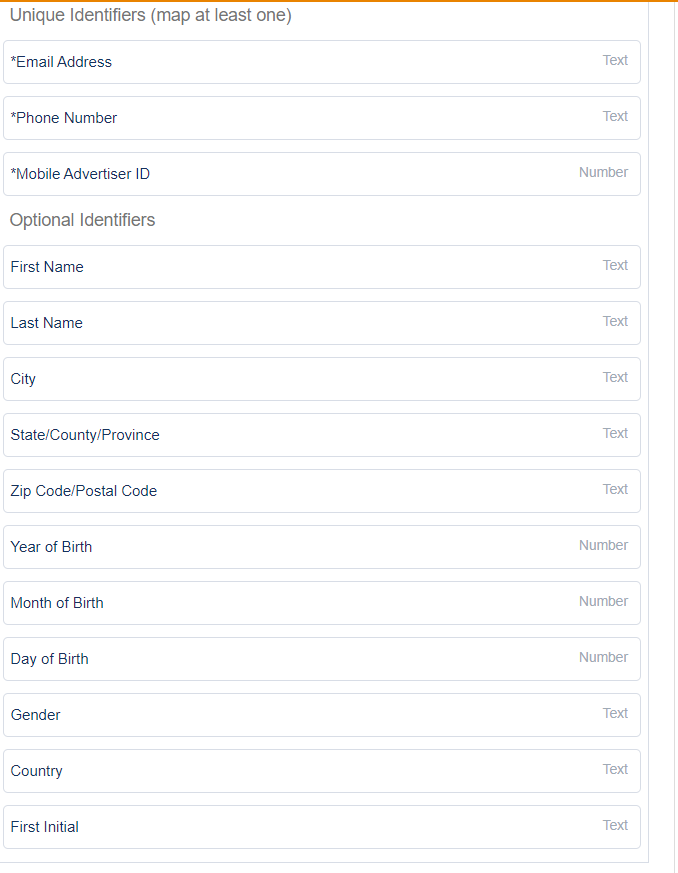
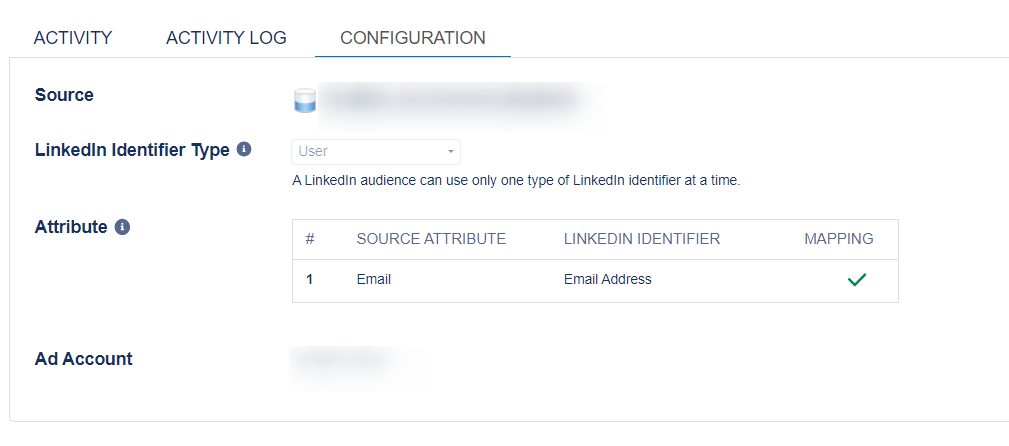
- Attribute: Here, you specify the mapping to match the attributes from the source data and the advertising platform. You can map at least one from the unique identifiers (email address, phone number, mobile advertiser ID). There are optional identifiers you can add for mapping.
Higher match rates with better identifiers = more of the right people seeing your ad. - Notifications: Add the mail address where you want the notifications for the following to be sent:
- THE AUDIENCE UPLOAD IS COMPLETE
- THE AUDIENCE IS REFRESHED
- AN ERROR OCCURS
What are Lookalikes’ Audience?
Facebook compares the data in the MC audience with its users and creates a new audience that is more like the individuals in your original list. You have two options for matching.
- Optimize for Similarity: Find the top 1% of users that match.
- Pros: Closer match to your current customers.
- Cons: Smaller audience size.
- Optimize for Reach: Find the top 5% of users that match.
- Pros: The bigger audience.
- Cons: They may not be ideal customers.
After you create an audience, you can view three tabs that display all the details configured:
- Activity Tab: Here, you can view the Source Audience Count, Social account Audience Count, and Match Rate. You can also change the status of your audience, add a Lookalike audience, and change the refresh rate (i.e., when the audience needs to be refreshed. Audiences can be refreshed daily or weekly, up to 99 weeks.). You can automate this or refresh it manually.
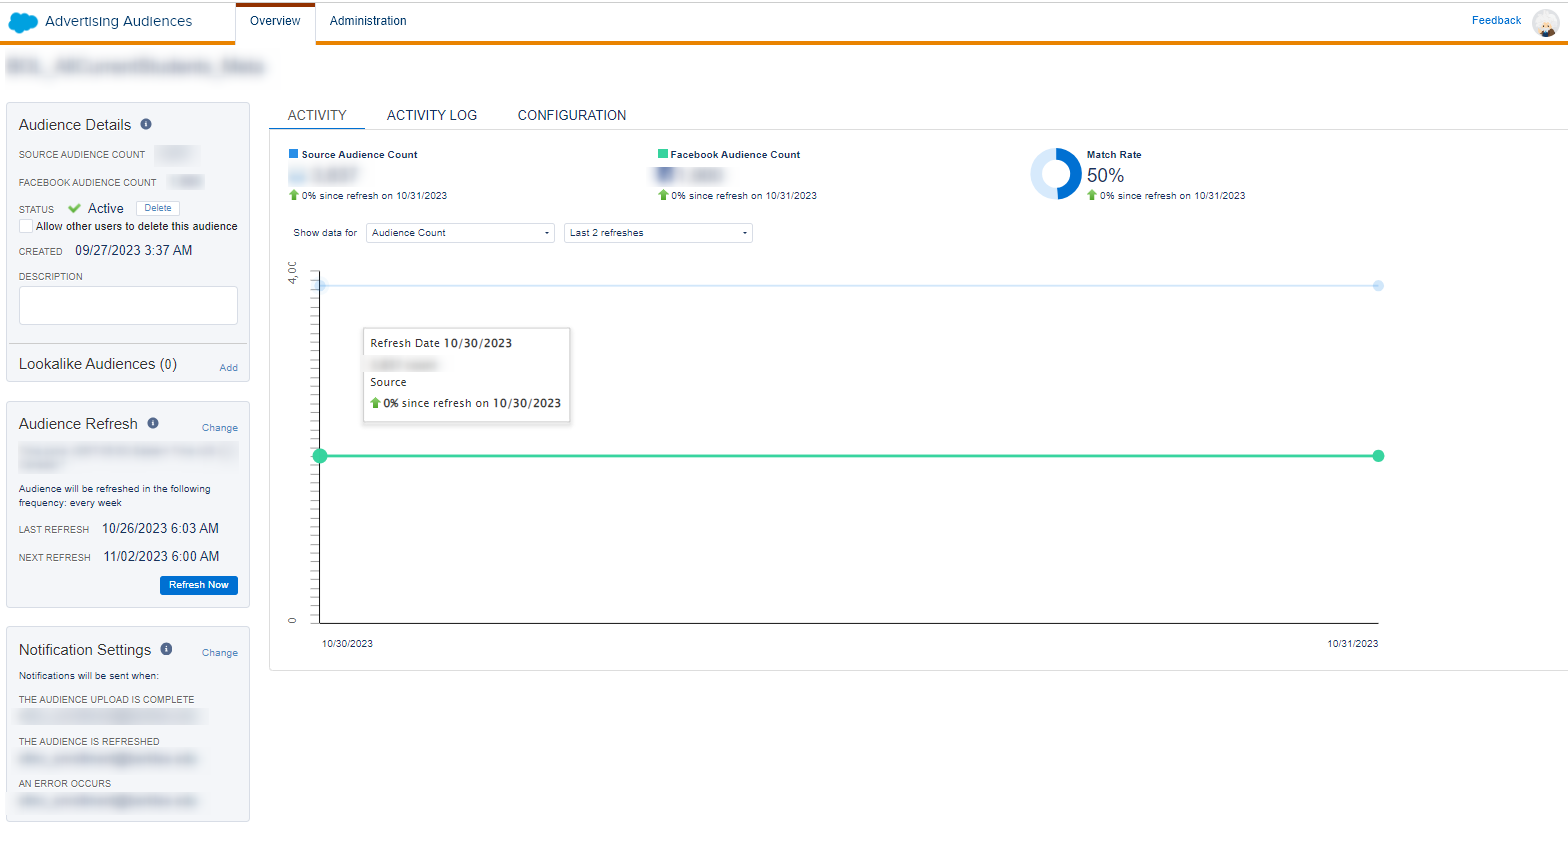
- Activity Log tab: Here, you can view all the details related to when your audience was refreshed.
- Configuration tab: This tab includes all the configuration details that you have configured on the configuration page.
List of standard and optional identifiers for adding Audience:
Facebook and Instagram
Matches data based on standard or advanced data points. The more attributes you can match, the better your match rate since it preserves the 1:1 relationship.
- Standard Unique Attributes: email, phone, mobile advertiser ID, or Facebook app user ID.
- Advanced Match Data Points: first name or initial, last name, city, state/province, county, date of birth, year of birth, age, zip/postal code, and/or gender.
Google AdWords
- Standard: Matches data to a logged-in user on any Google property using email.
- Google Customer Match: Matches on email, mobile ID, and phone number.
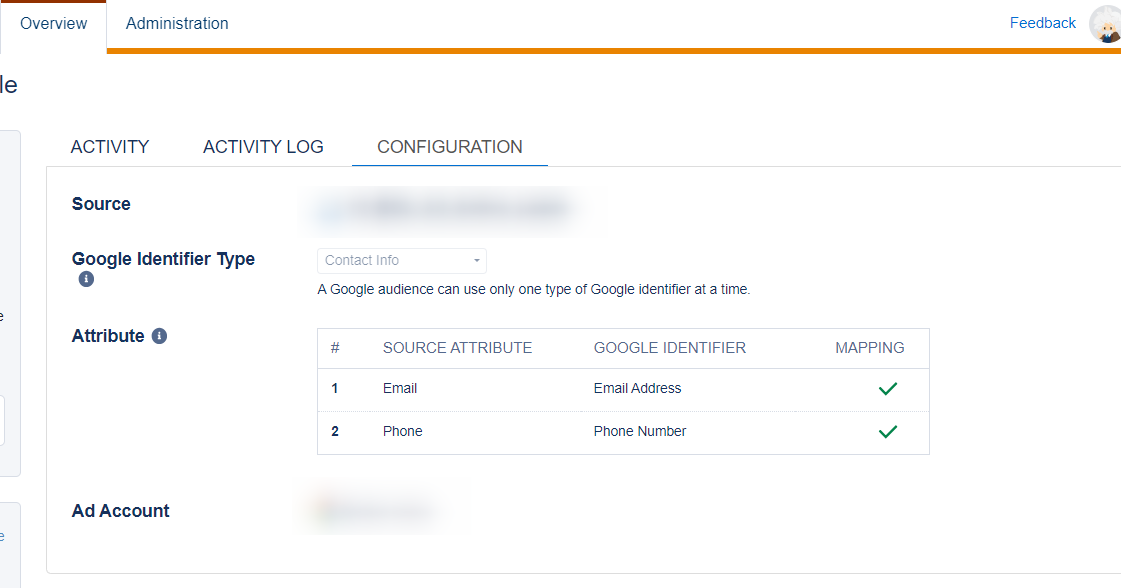
- Matches data on email.
Notes:
- When you update the refresh rate the time should not be in the past, it should be in the future otherwise it will not let you update.
- There is a limit to the number of audiences that can be activated in Advertising Studio based on your Salesforce agreement. You can purchase more audiences by contacting your account representative.
- You might face an error when connecting your Facebook accounts. So, make sure to have administrative permissions to your Facebook accounts.
- If you have one list or DE and use the same for Facebook and Google AdWords, Advertising Studio treats them as two separate Audiences.
- We cannot change the name of the audience once it is activated.
- Make sure to log out from everything before authenticating otherwise you might accidentally log in to your personal accounts.
Hope this helps. Please share your feedback in comments.


